Localization of an Asp.net mvc Core application
Configure for localization
Like everything in the Asp.net Core, you have to modify your startup class. Because by default only the minimum is configured. So you’ll need to op-in localization in you application. This is done in the ConfigureServices method in the Startup class.
public void ConfigureServices(IServiceCollection services)
{
   services.AddLocalization(options => options.ResourcesPath = "Resources");

   services.AddMvc().AddViewLocalization();
   ...

}
The resource path points to a relative path from the application’s root. Asp.net Core will use this path to find our resource files. Since we also want to localize our mvc views, we will also need to add view localization on the mvcbuilder object.
The next thing that has to be done, is to specify which cultures your are going to support. This is done by passing in a “RequestLocalizationOptions” object. This object will be used for each request to select your culture.
public void Configure(IApplicationBuilder app, IHostingEnvironment env, ILoggerFactory loggerFactory)
{
   var myCultures = new[]
            {
                new CultureInfo("en-US"),
                new CultureInfo("nl")
            };

   app.UseRequestLocalization(new RequestLocalizationOptions
            {
                SupportedCultures = myCultures,
                SupportedUICultures = myCultures,
                DefaultRequestCulture = new Microsoft.AspNetCore.Localization.RequestCulture("en-us")
            });
}
In this object you can specify your supported Culture and UICulture. You can even specify a default culture. In this case my supported cultures are “en-us” and “nl” with a default culture of “en-us”.
The new infrastructure
To resolve localized messages, you can use the new IStringLocalizer<> and IHtmlLocalizer<>. On these objects an indexer is implemented that will accept a string. This string is then looked up in the resource to return the localized message. The IHtmlLocalizer is used to return localized encoded html string.
With these new objects, you can actually develop your applications without creating a any resource file. If no resource file is found, the passed in key will be returned as localized message.
Localize your controllers
To use these 2 new objects, you can just put them as a parameter in the constructor of your controller. The dependency injection mechanisme will take care of the rest. Both interfaces are actually generics. To get the resources that are linked to your controller you can just pass in the controller type in the the generic parameter. So for your HomeController, you’ll put a IStringLocalizer<HomeController> in the constructor.
public class HomeController : Controller
{
    readonly IStringLocalizer<HomeController> _localizer;

    public HomeController(IStringLocalizer<HomeController> localizer)
    {
        _localizer = localizer;
    }


    public string Index()
    {
       return _localizer["message"];
    }
}
When you run your application, you’ll get no error and the string “message” will be shown. To show a localized message, i need to create some resource files in the “Resources” folder. But how does the localizer know which resource file it has to take? This is actually based on the filename or the filepath of the resource file.
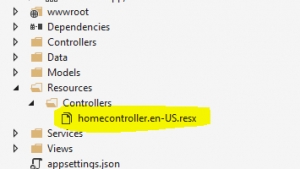
In this example i could do something this:
Path way: Resources/Controllers/HomeController.en-US.resx
Dot way: Resources/Controllers.HomeController.en-US.resx
I chose the first way.
Localize your Views
Localizing your views is actually very simple. You can inject a IViewLocalizer in your view using the @inject statement. This IViewLocalizer actually works in the same way as a IHtmlLocalizer. You also pass in a key and it will return the localized message.
@using Microsoft.AspNetCore.Mvc.Localization

@inject IViewLocalizer Localizer

@{
    ViewData["Title"] = "Home Page";
}

<h1>
    Localizer["message"]
</h1>
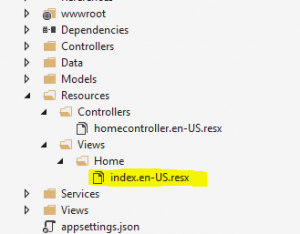
To link a resource file you can use the same method as for your controllers.
Path way: Resources/Views/Home/index.en-US.resx
Dot way: Resources/Views.Home.index.en-US.resx